
Injecting your VNETs with Azure Databricks
In a previous post I talked a bit about automation concerns and Azure databricks. One of the key considerations, from a security perspective anyways, when deploying Azure databricks is VNET injection. The goal of this post is to chat a bit more about that feature.
Many azure PaaS services are offering VNET injection type features. Effectively, this feature allows the “service” to deploy it’s resources directly in to one of your VNETs, allowing you to use the service while providing your own security “around” that service. In many cases this can allow you to meet your compliance and/or security needs while continuing to use the service.
Before we dive in to how to VNET inject your databricks workspace, lets talk a bit more about the databricks service itself. As per https://databricks.com/blog/2019/03/20/azure-databricks-bring-your-own-vnet.html, Azure databricks is a managed application with two core “planes” of service. The first is the control plane. This is effectively the databricks API, and allows users to interact with the workspace. The second is the data plane, which is effectively where the clusters are deployed and where they do “their work”. See the below diagram for a default implementation.
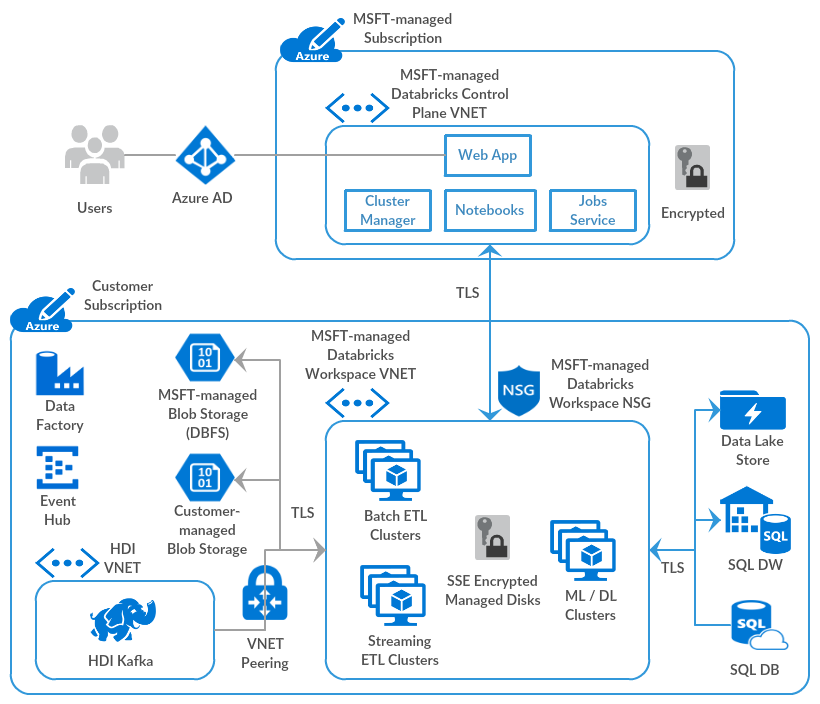
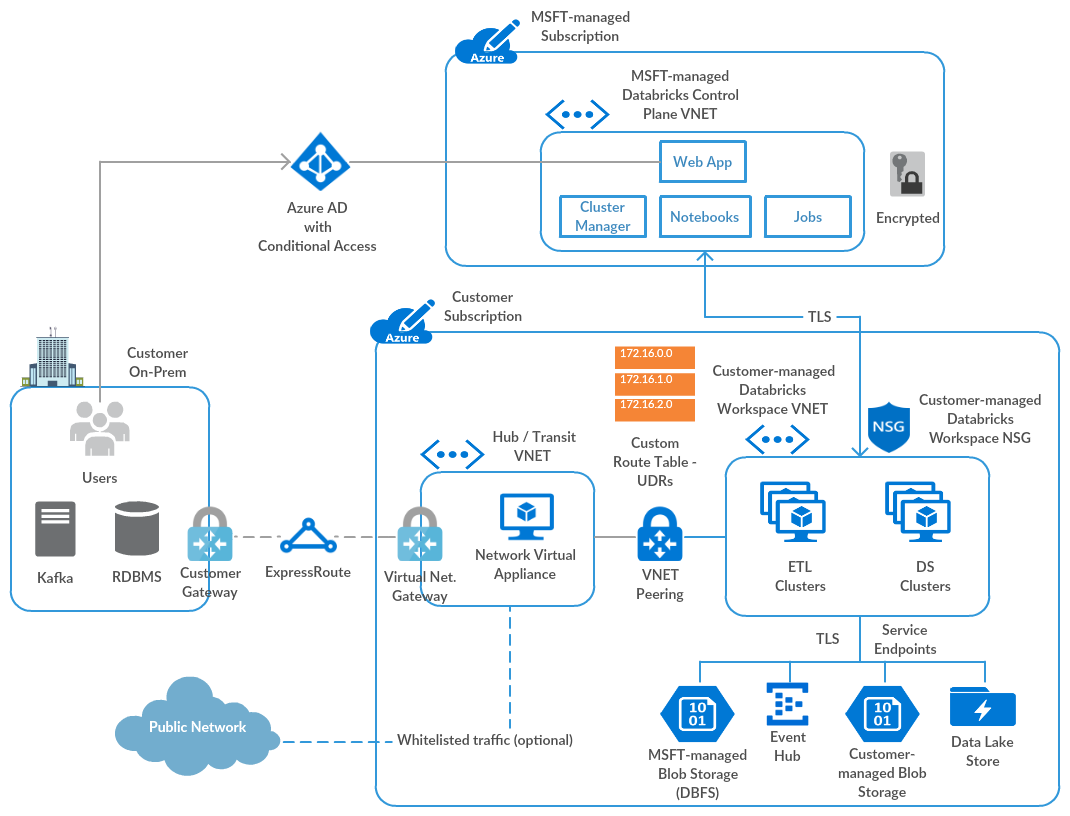
Effectively, the databricks service makes use of Microsoft managed application features to create controlled resource groups, virtual networks, and other components in your subscription to host the data plane of their application. So, the above diagram effectively looks like this when you add VNET injection:
The Azure feature that makes all of this magic possible is called delegation. As detailed in this post) delegation allows for joint control of (in this case) a subnet. The owner of the subnet allows a service to deploy it’s resources in a specified subnet, and the service owner is allowed to specify the conditions required for delegation to be enabled, and it also allowed to add on other specific security and routing policies.
Now that we know a bit about how this all works, lets talk the actual steps.
- Create(or select) a VNET to use for VNET Injection
- Create(or select) 2 subnets to authorize for delegation (one for public and one for private)
- Create NSGs (one for each subnet) and attach them
- Create a VNET injected workspace with pointers to the public and private subnets
Step 1, 2, and 3 can easily be done via the portal or ARM templates. The only catch is to ensure you add delegation to the required subnets. Here is some sample ARM code that makes that happen:
                    {
                        "name":"publicsubnet",
                        "properties":{
                            "addressPrefix":"[parameters('publicSubnetPrefix')]",
                            "networkSecurityGroup":{
                                "id":"[resourceId('Microsoft.Network/networkSecurityGroups',concat(parameters('virtualNetworkName'),'-pubnsg'))]"
                            },
                            "delegations": [
                                {
                                    "name": "databricks-del-public",
                                    "properties": {
                                        "serviceName": "Microsoft.Databricks/workspaces"
                                    }
                                }
                            ]
                    },
Step 4 needs to be done at databricks workspace creation time, and requires that you know the resource ID of the VNET you are targeting, and the name of public and private subnet. The following snipit shows you what you’ll need to edit.
        {
            "type": "Microsoft.Databricks/workspaces",
            "apiVersion": "2018-04-01",
            "location": "[parameters('location')]",
            "name": "[parameters('workspaceName')]",
            "sku": {
                "name": "[parameters('pricingTier')]"
            },
            "properties": {
                "ManagedResourceGroupId": "[variables('managedResourceGroupId')]",
                "parameters": {
                    "customVirtualNetworkId": {
                        "value": "[parameters('customVirtualNetworkId')]"
                    },
                    "customPublicSubnetName": {
                        "value": "[parameters('customPublicSubnetName')]"
                    },
                    "customPrivateSubnetName": {
                        "value": "[parameters('customPrivateSubnetName')]"
                    }
                }
            },
}
And that is about it! If all is successful, you will see your cluster resources spin up in your VNET of choice. Enjoy!
About Shamir Charania

Shamir Charania, a seasoned cloud expert, possesses in-depth expertise in Amazon Web Services (AWS) and Microsoft Azure, complemented by his six-year tenure as a Microsoft MVP in Azure. At Keep Secure, Shamir provides strategic cloud guidance, with senior architecture-level decision-making to having the technical chops to back it all up. With a strong emphasis on cybersecurity, he develops robust global cloud strategies prioritizing data protection and resilience. Leveraging complexity theory, Shamir delivers innovative and elegant solutions to address complex requirements while driving business growth, positioning himself as a driving force in cloud transformation for organizations in the digital age.